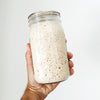
Photo by @breadletterday
Duration: 7 Days
After reading the healthy benefits of sourdough in my blog post called: Want to Eat Sourdough and Stay Healthy? You must be craving to make your own sourdough bread! One of the key ingredients to start making your own is to first make your very own homemade sourdough starter!
I will be showing you how to make a daily starter. The process should take about 7 days or a little bit more. You can use your starter daily or every two or three days.
Equipment:
Glass Jar: A liter jar should do, but the jar I used holds 2.5 cups of water. Ensure your jar has a lid too. The reason glass is preferred is so you’re able to visually inspect the mixture from time to time. It helps you stir properly as well. Also, the lid ensures that you have just the right amount of heat and moisture trapped in.
Spatula: It’s preferable to use a plastic spatula. They stir Well. Plus, a plastic spatula cleans more easily.
Filtered Water: Filtered water would usually give better results because of the reduced chlorine content, extremely reduced chlorine content if you compare to tap water. If you can boil your water, even better!
Scale: This is extremely important. To achieve the best results, you must get the right measurement of everything you use. It is best to go by weight instead of volume. I used the Accuweight Food Scale because it's the most affordable I've found and comes with batteries!
Flour: I highly recommend you try out Rye Flour first because it is the easiest to begin a starter because it is best for the right cultivation --- but any flour works, just may take longer! Some other people might mix the rye flour with the unbleached white flour. This is also good. Just ensure it is 50% each and the measurement is consistent. (1)
Now that you have all your materials, we can get to work.
Instructions:
Day 1: 10:30am
1. Weigh your glass jar. This is important to know what the actual weight of the starter would be and determine how much you discard each day. Also, note whether you measured it with the lid on or off (I prefer measuring with the lid off). Write the weight on a piece of tape and place on the jar. My jar weighed 283 grams with lid off.

3. Add 60g of your filtered water. It is best to have the filtered water sit out in a glass throughout the night or boiled before and place the filtered and boiled water into the jar when it is lukewarm temperature.
4. Stir the jar until there is no dry flour left in sight. Just hold the jar and move in a cyclical Manner to stir.

Boss Tip: In the inside of the jar, keep the sides "clean." As in, use your spatula to wipe the sides as you stir. This makes it easier because when you finishing stirring and leaving the sides clean, it will be easier to see the starter grow and grow faster.
5. Place the lid on and keep in a shaded slightly warm part of a room, a kitchen may be a good idea, preferably on top of the refrigerator (if it is warm). Mine happened to not be warm so I kept it in my dark closet room with the ceiling fan off so my room is warmer.
That’s it for Day 1! We’ll check in the morning to see how the starter is doing and begin the feeding process.
Day 2: 10:30am
It is time for your first feeding, but you should check for signs of life by looking around the jar. You should see some bubbles. Take off the lid. It is more likely to have a tangy or vinegary smell. You may even notice a dark crust at the top. It is perfectly normal.
1. To do your first feeding, discard some of your starter until there is 60g left. For example, if your jar weighs 270g then Jar weight (270g) + Starter (60g). That should be 330g in total on your scale.
2. Add 60g of your rye flour to the top of your starter just like the first day.
3. Add 60g of water.
4. Stir properly until there is no dry flour left and keep the sides clean.
5. Use a red marker or tape to "mark" the highest level your starter reaches in the jar -- you will use this to measure if your starter rises or drops. This is a good marker to if you notice your sourdough starter rise to a high peak and then all of a sudden fall way below the marker and if it decides to "sit" at that level then it will turn bad. (You will want to try to feed the starter once it's been sitting at the peak for awhile, this means that the bacteria is expanding and will need more food if it wants to survive.)
6. Place it back into your dark warm room.
You would know you’re doing the right thing if you begin to notice signs of life around the jar. If you don't, it’s still okay. You may not just have as many microorganic activities happening around your kitchen.
Boss Tip: If you notice that you do not have much activity in your starter (bubbles) then consider walking outside in your front or back yard to capture some of the wild yeast grazing (floating) in the air!
Days 3 to 5:
Continue the same process until day 5. If at this time, you notice that the starter is becoming soupy, you should add a few more grams of flour to the culture. That is only if there is no other option left -- I do recommend waiting until the end of Day 4 to really see the bubbles start showing. If you do this, remember to continuously add 20 grams to your flour from now and in the future. For example, you add 60g of flour and 60g of water but now that it is soupy you do 80g of flour and add 60g of water. During the phase of discarding the starter it can stay the same, for example, you must leave 60g of starter in the jar when you discard. You can do the opposite (60g of flour and 80g of water) if you're starter is being a bit heavy and not showing much growth. Remember to record how much your jar weighs comes in handy here. Okay now that we got that out of the way, you should’ve also started noticing some rising and dropping too. It is now time to begin feeding your starter twice a day tomorrow.
Day 6:
Today, you will do your usual feeding in the morning, then a second feeding 8 hours later. Before you do the second feeding in the evening, you should check for rising and falling, and the smell. From this point, the longer you let it stay without feeding, the higher the acid load, and this will affect the flavor of your bread.
Day 7:
Day 7 should be the last feeding day for your weekly baking. You can do 3 feedings today. Do your usual morning feeding. Give it about 5 to 6 hours, then do a second feeding. You should notice more bubbles and pockets now. The smell should also still be somewhat sweet. Wait until about 10pm, then do a third feeding.
There should be enough activity in your starter now to prepare your leaven for baking the next day. You can check the readiness of your starter by using a “float test." Float test means that when you place a little bit of starter on top of a glass of water, if it sinks, it needs more time. If it doesn't sink, it is ready!
Keeping your Starter Alive
Now that your starter is ready, you can continue to feed it twice or thrice daily if you’re a daily baker. Otherwise, you can store in the fridge and bring it out to begin feeding about three days before baking.
If you’re going to take a break from baking, you can store your starter in the fridge and just feed it once every week or every two weeks. If you find some liquid floating on top of your culture, just drain it. It’s the alcohol produced by fermentation. This keeps it alive till you’re ready to start baking again.
Reducing your Starter
In case you’re worried about how much it would cost to maintain your starter (discarding and feeding your culture), you may consider reducing the amount. It is possible and will still produce great bread, except that you might need to wait longer for your dough to proof and rise.
You can reduce your starter as much as you want to. Just ensure you have the same amount of flour and water to top it with. This is to ensure that you maintain the 100% hydration of our recipe. So if you have a 30g of starter, you could use 30g of water and 30g of flour when you’re feeding it.
Conclusion:
Sourdough bread is rich and tasty. If you feed your starter as often as you should, your bread will not be too sour. So if you don't like the already-prepared starter, you can make yours and start enjoying tasty leavened bread with these simple and effective steps!
What do you think? Comment below for any questions or your progress updates! Would love to read!